DIY: How to shoot great product photos


A clear product description is a great start, but to be successful, you need to take it one step further. Product photos are a must in your online store. But how do you take professional-looking photos? Below you’ll find a few handy, basic tips and tricks from the e-book ‘Product photography’ by Eberhard Schuy.
Types of product photography
As mentioned earlier, a good product description is essential, but great product photos are equally important. Let’s have a closer look at the different types of product photography so that you can easily find out what type of images you should use.
- 1. Packshot photography
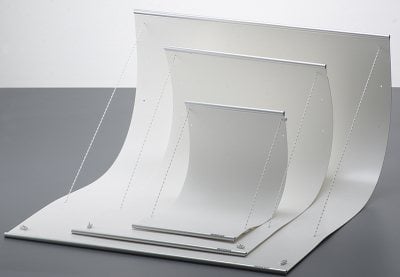
Packshot photos show products against a white backdrop, which is also called a ‘sweep’. This allows you to highlight the product features. The goal is to give an objective, realistic view of the product.
- 2. Product photography
Unlike packshots, attributes can be included in product photos to create more of an atmosphere. This can result in more attractive and striking photos that tickle potential customers’ interest. Needless to say, the attributes must match the product in question, which should always be the central focus.
- 3. Still-life photography
In these photos, the photographer can give his creativity free rein. Everything is possible. The composition needn’t be static and the link between the photo and the object behind the lens can be totally abstract. The main goal of this type of photography is to stir up emotions.

In these photos, the photographer can give his creativity free rein. Everything is possible. The composition needn’t be static and the link between the photo and the object behind the lens can be totally abstract. The main goal of this type of photography is to stir up emotions.
You could say that still-life photography tells a story and conveys a feeling. Product photography and packshots, on the other hand, aim to give as much information about the product as possible. In online stores the latter are often used in product overviews, because they are easier on the eye.
Keen to showcase your product in action? Still-life photography is the way to go, as it conveys your message and it is ideal for a slideshow on your homepage, for example.
What do you need?
A camera with a lens
If you think you need a camera that costs an arm and a leg to take great product photos, think again. As long as your photos needn’t be larger than A4 size, any common system camera will do, as long as you can set the lighting manually, which allows you to find exactly the right setting.
Background & tools
A good background for your product photos is a must. You can use a simple sheet of white paper or you can buy special background materials, such as a flexible white plastic sheet. The advantage of the latter is that it cannot crease or tear.
As for tools, you can use glue paste, wooden sticks and support blocks, depending on the product you are shooting. Sometimes a tripod can also be useful, for example in case of a long shutter speed.

Light and lighting
If you’re just getting started with product photography, it’s very important to keep a close eye on the lighting. You may have heard of a ‘light tent’. That’s a tool to ensure the lighting is always the same. However, you can achieve an equally good result with nothing but a white work surface, a white sheet of paper and some natural light.
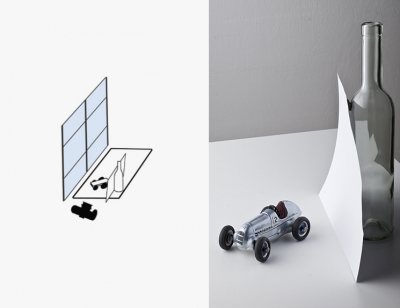
Ideally, you take photos close to a window, ensuring no direct sunlight hits your shooting surface to prevent excessively harsh light or hard shadows. The lighting angle required can differ from one product to the next, so you’ll have to experiment a little. A slightly longer shutter time generally highlights the dark parts of the object. Prevent hard shadows to keep the product details and materials well visible.
The image below shows you the ideal situation to photograph a model car – daylight shining diagonally from the back, reflecting onto a white background and base. As a screen use a glass bottle with a sheet of paper. Make sure the bottle is transparent, because colored bottles can result in discolorations and streaks.

Tips & tricks
Tips & tricks
A few handy tips to take your product photos to a higher level :)
A few handy tips to take your product photos to a higher level :)
- Make sure the colors on the photo match the product’s real colors to avoid disappointment (and consequently also returns).
- Never choose a ‘creative angle’ for product photos and packshots, but rather an angle that realistically shows the product proportions.
- Use a longer shutter time for lighter photos (with more detail where there would normally be shadows).
- Always keep in mind the main goal of your photos: do you want to arouse interest (still-life photography) or rather inform (product/packshot photography)?
- Always take photos with indirect lighting.
Needless to say, this is only the beginning. There is so much more to discover about product photography. That being said, I hope this blog post inspired you to start experimenting. Enjoy taking beautiful photos of your products!
Photo credits: Eberhard Schuy
