How do I integrate Google Tag Manager?
Google Tag Manager
Google Tag Manager (GTM) allows you to place HTML tags on your website, for example to integrate a live-chat feature. Google has a list of commonly used tags for you to choose from, which you can integrate in your online store with just a few easy clicks. Keen on using custom tags? Then you’ll need some technical know-how. Below we explain how to integrate GTM in your online store. Once that’s done, it’s time for you to choose or create the tags you need!
Let op
Unfortunately, this tool cannot be used when you run a free GO shop. Also bear in mind that our support team cannot help you create your tags. Sorry :(
1. Create an account
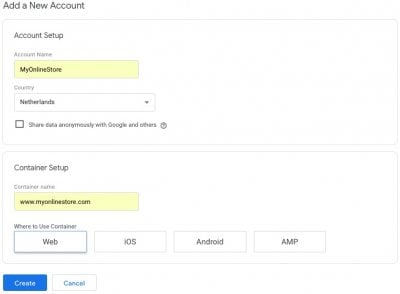
Go to tagmanager.google.com and log in using your Google account. Now you can start creating your account and a 'container', which contains all your tags and will be linked to your online store. Enter the following details
- Your 'Account name': the name of your business or online store.
- Click on 'Next'.
- Under 'Container name' enter your domain name.
- Choose the option 'Internet' and click on 'Create'.
Do you agree with the service agreement displayed? Or maybe not, but are you keen to get started? Then simply click ‘Yes’. You will now see a code. No need to place it in your online store. We’ll do that for you!

2. Link your container to your online store
In the back office you can go to the tab ‘Google Tag Manager’ under ‘Google services’. Click on the green button to link it to your Google account. You’ve probably done this already for Google Analytics and/or the Google Search Console. Then activate the button 'Use the Google Tag Manager'. Is your container ticked already? Then all you need to do is click ‘save’.

3. Add tags
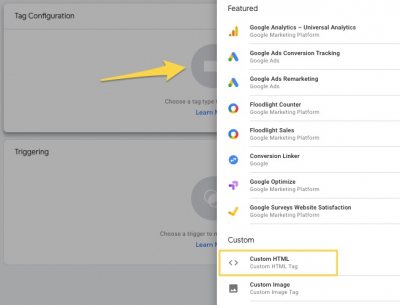
So, that wasn’t too bad, right? Now it’s time to fill your container! You can add the ready-made Google tags or create your own HTML tags, for example to add a live-chat feature to every page in your online store or to show Google Maps on your contact page.

The tags you’ve created yourself are placed in a new version of your container, so they won’t be enabled immediately in your store. That allows you to check whether everything is still working as it should. You can open a preview by clicking on the red arrow next to the button ‘Publish’ in the top right-hand corner. Everything OK? Then go ahead and publish! Well done!
